Custom Labels in Google Merchant Center: What, Why & How

If you’re running Google Shopping campaigns, using custom labels in Google Merchant Center is one of the easiest ways to take control of your product feed. These hidden fields let you group products by seasonality, margin, promotions, and more, giving you better bidding and cleaner segmentation.
In this guide, you’ll learn how to set up, optimize, and automate custom labels to make every ad dollar work harder.
What are Custom Labels in Google Merchant Center?
Custom labels are optional fields in your product feed that let you group products in Google Merchant Center (GMC) for campaign segmentation. They’re not shown to shoppers, but they help you organize items based on your own rules, like profit margin, seasonal items, or promotional strategies.
Each label is defined by a value (like “bestseller” or “low margin”) and is added to one of five custom label slots (0 to 4).

Why Use Custom Labels in Google Shopping?
Default attributes like brand or category are helpful, but too generic in terms of proper bidding. Custom labels allow you to bundle your products according to your reasoning, giving you more power to work on runs and optimization of Google Shopping campaigns.
In fact, a Google case study showed that using advanced feed segmentation (including custom labels) helped advertisers increase conversion value by up to 28%.
Here’s how each custom label can be used effectively:
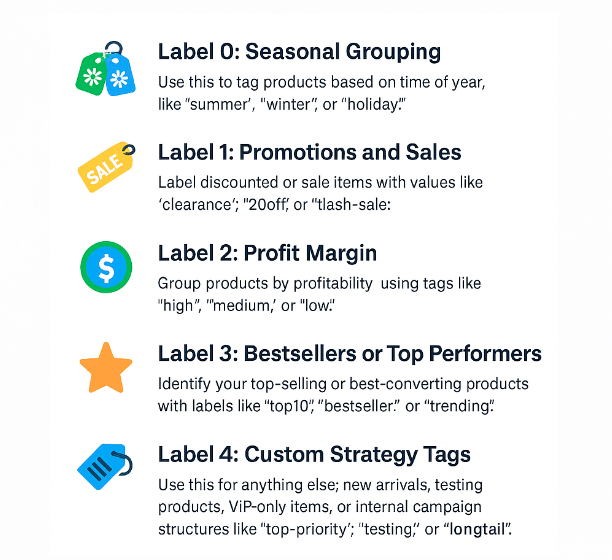
Label 0: Seasonal Grouping
Modify seasonal products with tags such as “summer”, “winter” or “holiday”.
Example: Tag jackets as winter and swimsuits as summer so you can increase bids during their peak season and pause or reduce them off-season.
Label 1: Promotions and Sales
Assign discounted products with values such as “clearance”, “20off”, “flash-sale”.
So you can isolate promo items for separate campaigns and watch budgets increase and exposure during sale events maximized.
Label 2: Profit Margin
Group products by profitability using tags like “high”, “medium”, or “low”.
This helps you bid more aggressively on high-margin items while keeping bids conservative for low-margin ones.
Label 3: Bestsellers or Top Performers
Label your best-selling or top-converting products with terms like “top10”, “bestseller”, or “trending”.
Campaigns targeted at these SKUs can be created for scaling or they can be tested inside Performance Max.
Label 4: Custom Strategy Tags
For everything else: new arrivals, test items, VIP-only goods, or internal campaign structures like “top-priority”, “testing”, or “longtail”.
It gives you flexibility to experiment with different bidding strategies, campaign rules, or A/B tests.
Custom Labels vs Default Attributes
While default attributes like brand, category, or product type are essential for feed structure, they aren’t designed for campaign strategy. That’s where custom labels come in, giving you flexibility to group products based on your business goals, not just what’s listed in your catalog.
| Feature | Default Attributes | Custom Labels |
|---|---|---|
| Visible to shoppers | ✅ Yes | ❌ No – backend only |
| Customizable groupings | ❌ Fixed (brand, category, etc.) | ✅ Fully based on your strategy |
| Supports campaign segmentation | ⚠️ Limited | ✅ Built specifically for campaign logic |
| Ideal for promotions & seasons | ❌ Manual setup needed | ✅ Yes – tag sale items, holiday SKUs, etc. |
| Can reflect business KPIs (like ROAS) | ❌ Not directly | ✅ Yes – align bids with margin, priority |
| Automation-friendly | ⚠️ Possible but complex | ✅ Easily automated with feed rules |
In short, default attributes tell Google what your product is, while custom labels let you tell Google how you want to market it.
How to Set Up Custom Labels in Google Merchant Center?
Adding custom labels to your product feed is a simple but powerful way to gain more control over how your products are grouped and bid on in Google Shopping campaigns. Here’s how to set them up:
Step 1: Edit Your Product Feed
Start by opening your product feed, which could be a Google Sheet, a CSV file, an XML feed, or a feed connected via API.
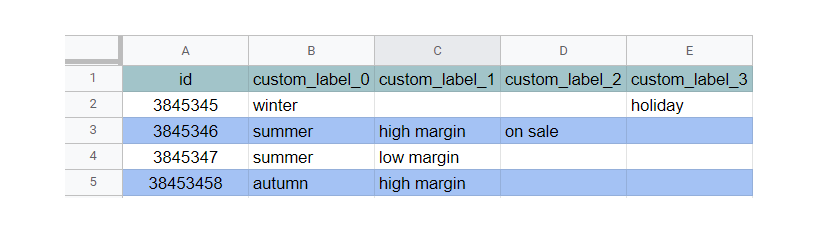
Add up to five new columns named:
- custom_label_0
- custom_label_1
- custom_label_2
- custom_label_3
- custom_label_4
Fill in each column with clear and consistent values that reflect your business strategy.
For example:
- custom_label_0: summer, winter
- custom_label_1: clearance, 20off
- custom_label_2: high, low
Keep the values short and standardized, this will make segmentation much easier in Google Ads later.
Step 2: Re-upload the Feed to Merchant Center
Once you’ve updated your feed, log into Google Merchant Center: https://merchants.google.com
Go to Products > Feed, select your active product feed, and re-upload the new version with the custom label columns included.

After submission, Google will review the feed.
Make sure there are no errors or item disapprovals, otherwise, your labels won’t be applied correctly in campaigns.
Step 3: Use Custom Labels in Google Ads
Next, open your Google Ads account and navigate to your Shopping campaign.
After updating your product feeds, the next step is to restructure your Google Shopping campaigns. Use your newly assigned custom labels to guide your bidding strategy and reallocate your budget as needed.
10 Smart Custom Labels for Google Shopping Campaigns
Custom labels are one of the most powerful tools for merchants who want to gain more control over their Google Shopping campaigns. Below are 10 common (and effective) custom labels you can use, each with a practical use case to help you optimize performance and scale smartly.
1. Sale, Clearance & Promo Items
Use this label to group discounted items, clearance products, or limited-time offers. These products usually require a different bidding strategy since their prices are reduced to drive volume.
Goal: Increase exposure and conversions for promotional products during sales events or seasonal clearances.
2. Price Range
Segment your catalog based on price points. For example, group items as low-priced, mid-tier, or premium. This helps you optimize ROAS strategies depending on item value.
Goal: Allocate budget based on item value and purchasing behavior across different customer segments.
3. Profit Margin
Group products by their profit margin so you can bid more aggressively on high-margin items and be conservative with low-margin ones.
A digital agency working with high-margin product groups implemented custom labels to isolate those SKUs and apply a unique bidding strategy. The result? Revenue increased by 85% while maintaining a profitable ROAS.
Goal: Align ad spend with profit potential, not just revenue.
4. Seasonal Products
Identify items that peak during specific times of year, like jackets for winter or swimwear for summer. This lets you scale up campaigns only when demand is high.
Goal: Maximize seasonal relevance and reduce wasted spend during off-season.
5. Bestselling Products
Highlight your top performers by tagging items with high conversion rates or strong sales volume.
Goal: Boost visibility and budget allocation for proven products.
6. New Arrivals
Flag recently launched products to give them initial exposure and performance testing.
Goal: Help new SKUs ramp up faster and gain traction in competitive ad auctions.
7. Low Inventory Items
Label items with limited stock, e.g., under 5 units left or fewer than 3 size variants available.
Goal: Lower bids or exclude these items to avoid spending on products with a poor fulfillment experience.
8. Gender & Age Group
Even though age group and gender are default attributes, you can’t use them directly for campaign segmentation. Use custom labels to isolate products intended for men, women, kids, etc.
Goal: Tailor campaign messaging and creative assets more precisely to target demographics.
9. Product Collections
For brands that work on seasonal drops or curated collections, this label helps manage launch campaigns and allocate seasonal budgets accordingly.
Goal: Organize by merchandising strategy, match product to creative, and optimize new collection rollouts.
10. Underperforming Products
Tag products that have historically underperformed in visibility or engagement.
Goal: Break them into separate campaigns for testing, retargeting, or creative refresh strategies.
Combine these with automation tools like Feednexa to assign labels based on dynamic rules (inventory, price, or keywords) and you’ll save time while staying sharp in execution.
Case Study: Reduced Setup Costs with Strategic Custom Label
Annual cost savings: $60,000
Tailored Label Products saved $60,000 annually by grouping over 100 low-volume SKUs using a hybrid press strategy. Instead of printing each item separately, they implemented a combo run approach, similar to applying a shared custom label, which reduced setup time, minimized per-piece costs, and improved overall production efficiency.
How They Reduced Setup Costs
Instead of printing each SKU in isolation, TLP introduced a Hybrid Press that allowed combo runs for multiple small-batch products. This approach grouped similar items, like a custom label would, and drastically cut the setup and make-ready time between jobs.
Segmented label “buckets” included:
- Low-volume SKUs
- 4–6 color jobs
- Varying order frequencies
Result
- Cost savings: $60,000 annually
- Reduced held inventory thanks to more agile production
- Increased machine capacity by freeing up traditional presses
- Shorter turnaround times due to minimized make-ready steps
This operational shift is the print-production equivalent of labeling products with shared attributes in Google Merchant Center. Whether you’re optimizing campaigns or a production line, strategic segmentation works. Read the full case study here.

Best Practices for Using Google Custom Labels
Custom labels are easy to set up, but setting them up well is what leads to better performance in Google Shopping. Here are five essential best practices to organize, optimize, and scale your campaigns successfully.
1. Keep Label Values Clear and Consistent
Avoid long or inconsistent terms like HighMarginProducts and simply keep the value descriptions simple and lower case, like high, low, or summer. This will enhance the legibility of the product groups while filtering in Google Ads.
Greater consistency promotes automation compatibility and less confusion among your team members, especially if you or your team are managing campaign feed rules in-house or using an external tool.
2. Align Labels with Business Objectives
Each custom label standpoint marketing objectives concerning margin, seasonality, promotion tier, or such. Such a scenario guarantees that bidding strategies and budget allocations correspond directly to what is of concern to your business.
As a result, campaigns become more dependent on targeted objectives and fully measurable, with ROAS tracked based on the labels that carry meaningful criteria rather than just generic categories.
3. Limit the Number of Values per Label
Even though Google custom labels support up to 100 values, having many values makes product groups hard to manage.
Therefore, limit the number of values to only a handful of strategic values with which activation and implementation are easy. In creating such tests, keep campaigns uncluttered and scalable as the catalog grows.

4. Audit and Update Regularly
Initially, the business priorities may shift commonly, seasonal items might become evergreen, promotions run out, and pricing structures change. Hence, one should look into and update their custom labels at least quarterly.
By making sure your labels are up to date, you secure campaign logic in actuality and keep ad monies away from being wasted on cast-off and misclassified products.
5. Avoid Using PII or Internal Codes
While custom labels are never shown to customers, using anything sensitive or any internal codes, SKU references, usernames, or vendor notes, can greatly result in messy feeds and put you at risk.
Instead, use labels relevant to value and that anyone in marketing or product teams would comprehend without doubt.
Simplify Label Management with Feednexa
Managing custom labels across hundreds or thousands of SKUs can be tedious and error-prone, especially when done manually. That’s where Feednexa steps in as a game-changer for smart merchants.
With Feednexa, you can create custom rules to automatically assign labels based on real-time data such as inventory status, price threshold, or product type. These help maintain feed consistency, reduce manual error or labor, and allow cleaner segmentation within Google Ads.
For example, you can set up rules like:
- If the product tag is “Kids” > Set Age Group to “Kids”
- If the vendor is “Nike” > Set Custom Label 0 to “Brand_Nike”
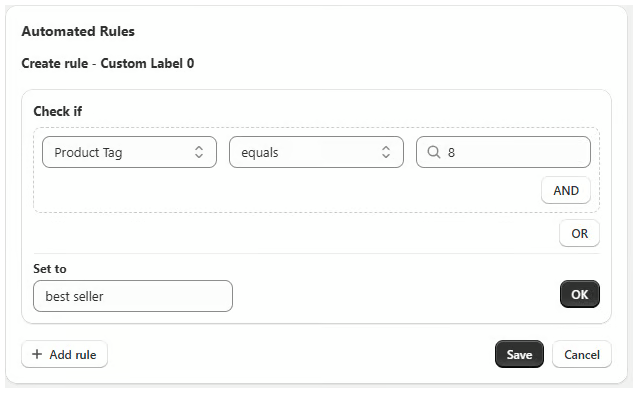
Once configured, these rules are applied during the next product sync, ensuring your feed remains optimized and compliant with Google’s requirements.
So if you’re looking to scale your Shopping campaigns without scaling the chaos, Feednexa helps you label smarter, not harder.

Common Mistakes to Avoid with Custom Labels
While custom labels are powerful, they can quickly become a source of confusion or even campaign inefficiency if misused. Here are the most common mistakes merchants make, and how to avoid them for a cleaner, smarter Shopping setup.
1. Overcomplicating Label Structures
Using too many labels, subcategories, or vague values like bundle-clearance-q4-lowmargin may seem organized at first, but it often leads to over-segmentation and poor visibility inside Google Ads.
Instead, keep labels simple and targeted. A term like clearance or low-margin is easier to manage and still gives you actionable campaign control without cluttering your product feed.
2. Neglecting to Update Labels Over Time
Many businesses set custom labels once and never look back. But products, promotions, and priorities change, so your labels should too.
Regularly reviewing and adjusting labels ensures that your bidding and segmentation reflect your current strategy, not a snapshot from six months ago.
3. Using Inconsistent Naming Conventions
Using high margin, HighMargin, and high-margin for the same idea can make segmentation frustrating and reporting unreliable. It also increases the risk of human error in campaign setup.
To avoid this, establish a clear naming format (e.g., all lowercase, hyphen-separated) and document it across your team or in your feed management tool.
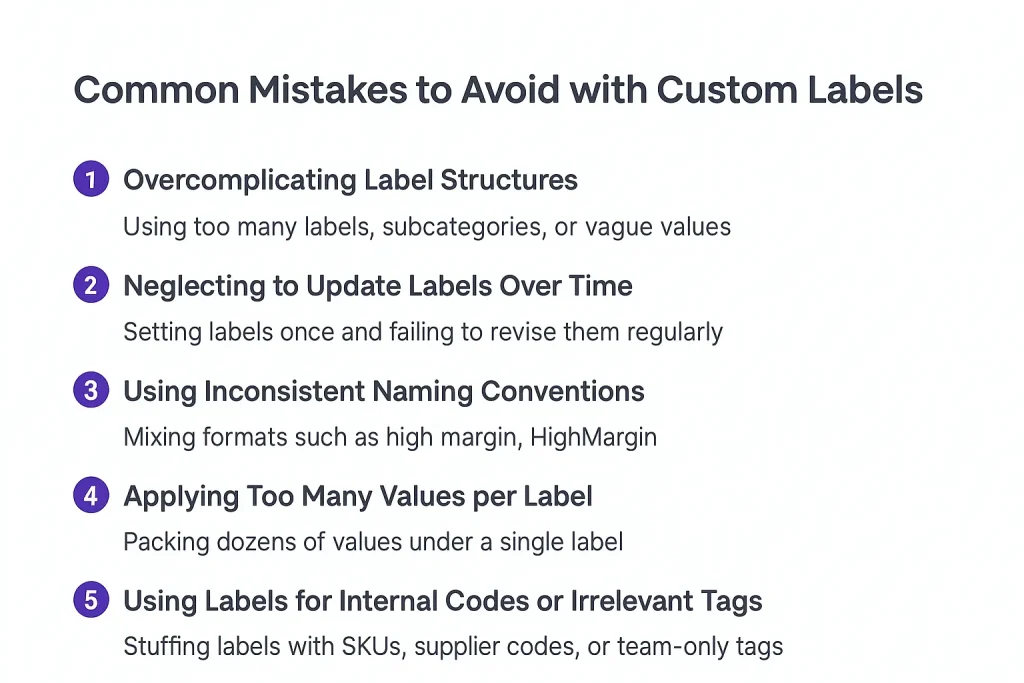
4. Applying Too Many Values per Label
Although Google allows up to 100 values per custom label, loading each label with dozens of values can make campaign structures bulky and hard to optimize.
Fewer, well-defined labels offer greater control and are easier to monitor for performance, especially when scaling product catalogs.
5. Using Labels for Internal Codes or Irrelevant Tags
Avoid stuffing labels with internal data like SKUs, supplier codes, or team-only tags (e.g., dev-test-01). These don’t help with campaign strategy and clutter your feed.
Custom labels should serve a marketing purpose, grouping products based on value, seasonality, margin, or intent, not act as a database for backend references.
Frequently Asked Questions
While working with merchants on Google Shopping campaigns, I’ve come across a handful of recurring questions about custom labels in Google Merchant Center. Below are the most common ones:
How many custom labels can I use in Google Merchant Center?
You can create up to five custom labels, from custom_label_0 to custom_label_4. Each one accepts a single value per product, giving you flexible ways to group and manage your catalog.
That may sound limited, but when planned well, five smart label slots are more than enough to drive strategic bidding and segmentation across all your campaigns.
Can I change custom label values once the feed is approved?
Yes. You can update label values anytime by editing your product feed and re-uploading it to Google Merchant Center. Google will process the changes automatically if your feed is error-free.
However, keep in mind that changes in labels may break existing campaign logic in Google Ads, so be sure to review your campaign setup after updates.
Do custom labels affect how products appear to shoppers?
Not at all. Custom labels are only visible within your Merchant Center and Google Ads account. They’re used purely for internal grouping, bidding, and reporting.
Because of that, they’re a powerful tool for back-end strategy, without affecting how your product listings appear to customers.
Is there a way to automate custom label management?
Definitely. With a tool like Feednexa, you can set up automation rules to assign labels based on inventory, price, or even keywords, saving hours of manual work.
As a result, your feed stays consistent, clean, and aligned with your campaign logic. It’s an easy win for scaling smarter without losing control.
Can I use the same custom label across multiple products with different campaigns?
Yes, and that’s the point. By assigning the same label, like bestseller or 20off, to multiple SKUs, you can run separate campaigns targeting those products across regions, audiences, or strategies, without touching your core product data.
Conclusion
Custom labels in Google Merchant Center are a small feature that has a massive impact. Whether you want better bid control, cleaner reporting, or targeted promotions, this flexible tool can take your Google Shopping strategy to the next level.
If you’re looking to streamline the way you create and manage those labels, a feed automation tool like Feednexa can help you apply consistent logic across your entire catalog with ease. It eliminates manual updates, reduces errors, and saves hours of repetitive work.
A smarter feed is just a tool away. Don’t let your product data go to waste!